Hello friends! I hope you had a fabulous weekend! It's here ...my favorite time of year ... Autumn! I love the chill in the air, the smell of pumpkin pie baking in the oven, the fall craft festivals, and the anticipation of the holiday seasons - Halloween, Thanksgiving and then Christmas!
But, Autumn is also one of my favorite times of the year because of it's sheer beauty. We all can craft and create colorful and beautiful creations but the colors of the leaves and the beauty of the orange, yellow, red and green colors that blanket our landscapes in the fall can only be created by God. This is the inspiration for my piece this week ...
At Simon Says Stamp and Show, this week's challenge is all about leaves. Stop by the blog and see the truly beautiful projects the Design Team has made for you.

At Simon Says Stamp and Show, this week's challenge is all about leaves. Stop by the blog and see the truly beautiful projects the Design Team has made for you.

I created a Pop Up Tag celebrating the beauty of our world, especially the leaves of Autumn.


I remembered a really cool pop up tag I'd seen on Shelly Hickox's blog. I used her idea of the mechanism (Sizzix Scallop Circle 3-D Pop Up Die) to create my pop up feature. I cut that pop up feature out of acetate.
I began by using Tim Holtz' Tag and Bookplate Die Cut to cut a folded tag out of a manila folder. I left the folded edge of the manila folder about 1/16" of an inch inside where the die would cut across the bottom, so that my folded edge at the bottom of my tag would not be cut. I then pulled out two #8 manila tags that I would use to cover all of the mechanism I would be using to create the pop up feature.
First, I took the two #8 Manila Tags and colored them using Squeezed Lemonade, Rusty Hinge, Wild Honey Evergreen Bough and Gathered Twigs to recreate some of those gorgeous fall colors. I used Tim Holtz' spritz and flick method to add some random splatters to the tags as well. Finally, I added just a light brushing of Heirloom Gold Perfect Pearls to give them a bit of a shimmer.

Then I ran the tags through my Vagabond. One using the Branch Tree and Tall Pines Texture Fade that would create the bottom of my pop up tag. The other using Tim Holtz' Book Covers Set Texture Fade. That would be the embossed background for the top of my pop up tag.

I lightly took my ink applicator and swiped the raised tree with Gathered Twig Distress Ink to give a brown color. Then I decided to add some Copper Embossing Powder to really punch the color. So, I lightly wiped over the tree with my Distress Embossing Ink Pad and sprinkled the embossing power over the tree. Then I used a regular paint brush to wipe away all of the excess embossing powder that had attached itself to the tag. I also decided to brush away some of the powder from the tree, so that it would not be solid copper. I just wanted the copper to be more like highlights.

Then I heat set the power and I love the results. It even has some pretty cool texture. Then I rubbed more Gathered Twig over the tree and the tag to give it that rich, brown tone.

I wanted to be sure that the acetate mechanism would not wear out in the areas that would be folded a lot so I added a little piece of Tyvek on either side using 1/4" Scor Tape. I also added Tyvek on the inside of the folded bottom of the tag. That would be covered up when I added the embossed manila tags on top.

Next, I drew lines where I would need to make cuts so that my embossed tag could easily slide in place and cover the acetate base.

Then I slide the acetate mechanism in place and secured it with the tape. Then I glued the embossed tag in place on top of the manila folder tag that was my base.
Then it was time to work on the top of the pop up tag.

I embossed the top tag using Tim Holtz' Book Covers Texture Fade. I ran my ink applicator over the raised areas with the Gathered Twig to emphasize that lovely design. Next, I made pencil marks again where I would need to make cuts in order for that tag to slide in place. I embellished this tag before I slid it into place. Here is the tag before I attached it.

Using manila cardstock and Tim Holtz' Mini Tattered Leaves and Tattered Leaves die cuts, I cut out several leaves that I would use to create the embellishment for the background top of the pop up. I colorized these leaves using some of the distress colors mentioned above and also adding a touch of Picked Raspberry. Then I added some veins in the leaves with a Vintage Photo Distress Marker. I coated them with Rock Candy Crackle Paint. They took on a little of a porcelain finish when it had dried. I distressed them again with Gathered Twig and glued them in place with Glossy Accents.

Here is a better look at the detail of the leaves on the finished tag. They serve as the background for the popped out tree.
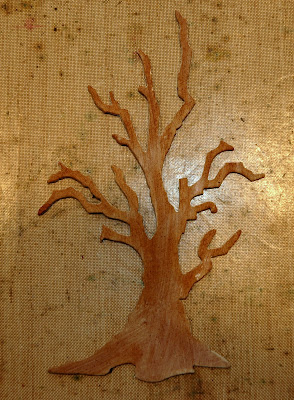
I cut Tim Holtz' Branch Tree out of Grungeboard and painted it with a baseboat of Snow Cap Paint Dabber. Then I lightly coated it with Vintage Photo Distress Stain.

I added some Distress Embossing Ink to the raised impression of the tree and sprinkled first Vintage Photo and then a little Walnut Stain Distress Embossing Powders on to the tree. I did this because I wanted a two tone embossed tree; using the darker browns. I like the variation in color that I got. And, Distress Embossing Powders have a great texture after they are heated; sort of a sandpaper feeling...like the bark of a tree.

I colored a manila tag with more of the distress ink colors and began punching leaves out of it.

These leaves were then distressed with Gathered Twig and either Rock Candy Crackle Paint or Rock Candy Stickles and glued in place on the tree with Glossy Accents.

Now all of my pieces were completed and ready to assemble. I slid the top embossed portion of the tag on top of the folded tag base, hiding the acetate mechanism. Then I used the Scor-Tape on the mechanism face to hold the tree in place. I attached a piece of black elastic cording at the top of the folded manila tag BEFORE I slid the embossed tag in place, using Tim Holtz' Tiny Attacher.

Finally, I wanted to finish the outside covers of my pop up tag. I sprayed the back with several different Glimmer Mist colors: Lemon Meringue, Dreamsicle, English Ivy, Jack O' Lantern and Sunflower. Then I distressed it with a little Gathered Twig. On to the front...
As I was working on this piece, I kept remembering a poem that I had learned in school "Trees" by Joyce Kilmer. It's such a lovely poem and so befitting this tag.

So, I picked a font, typed out the poem, sized it to fit a #8 Manila tag and printed it out. In this picture, you can see the before and after of the poem.

Once I sized it to the pop up tag, I distressed the poem, using the above mentioned Distress Ink colors.

I stamped the little vine print and then attached a few more of the little punched leaves I'd made. I also colored in the leaves on the vine using a Peeled Paint Distress Marker diluted with a Small Sakura Water Brush. I love how it turned out! Then I attached a copper finish Hitch Fastener, looped my elastic cord over the Hitch Fastener and my pop up tag was complete.
I hope that this piece has inspired you to create something beautiful using leaves...stamped, waxed, masked, whatever you choose. Then enter your piece into our weekly challenge at Simon Says Stamp and Show. You could be the lucky winner of our

$50.00 gift voucher. You could also be chosen as one of our TOP THREE entrees for the week and that is quite an accomplishment! Think leaves and let's see what you come up with!
Here are the Simon Says Products I used in this piece:

First, I took the two #8 Manila Tags and colored them using Squeezed Lemonade, Rusty Hinge, Wild Honey Evergreen Bough and Gathered Twigs to recreate some of those gorgeous fall colors. I used Tim Holtz' spritz and flick method to add some random splatters to the tags as well. Finally, I added just a light brushing of Heirloom Gold Perfect Pearls to give them a bit of a shimmer.

Then I ran the tags through my Vagabond. One using the Branch Tree and Tall Pines Texture Fade that would create the bottom of my pop up tag. The other using Tim Holtz' Book Covers Set Texture Fade. That would be the embossed background for the top of my pop up tag.

I lightly took my ink applicator and swiped the raised tree with Gathered Twig Distress Ink to give a brown color. Then I decided to add some Copper Embossing Powder to really punch the color. So, I lightly wiped over the tree with my Distress Embossing Ink Pad and sprinkled the embossing power over the tree. Then I used a regular paint brush to wipe away all of the excess embossing powder that had attached itself to the tag. I also decided to brush away some of the powder from the tree, so that it would not be solid copper. I just wanted the copper to be more like highlights.

Then I heat set the power and I love the results. It even has some pretty cool texture. Then I rubbed more Gathered Twig over the tree and the tag to give it that rich, brown tone.

I wanted to be sure that the acetate mechanism would not wear out in the areas that would be folded a lot so I added a little piece of Tyvek on either side using 1/4" Scor Tape. I also added Tyvek on the inside of the folded bottom of the tag. That would be covered up when I added the embossed manila tags on top.

Next, I drew lines where I would need to make cuts so that my embossed tag could easily slide in place and cover the acetate base.

Then I slide the acetate mechanism in place and secured it with the tape. Then I glued the embossed tag in place on top of the manila folder tag that was my base.
Then it was time to work on the top of the pop up tag.

I embossed the top tag using Tim Holtz' Book Covers Texture Fade. I ran my ink applicator over the raised areas with the Gathered Twig to emphasize that lovely design. Next, I made pencil marks again where I would need to make cuts in order for that tag to slide in place. I embellished this tag before I slid it into place. Here is the tag before I attached it.

Using manila cardstock and Tim Holtz' Mini Tattered Leaves and Tattered Leaves die cuts, I cut out several leaves that I would use to create the embellishment for the background top of the pop up. I colorized these leaves using some of the distress colors mentioned above and also adding a touch of Picked Raspberry. Then I added some veins in the leaves with a Vintage Photo Distress Marker. I coated them with Rock Candy Crackle Paint. They took on a little of a porcelain finish when it had dried. I distressed them again with Gathered Twig and glued them in place with Glossy Accents.

Here is a better look at the detail of the leaves on the finished tag. They serve as the background for the popped out tree.

I cut Tim Holtz' Branch Tree out of Grungeboard and painted it with a baseboat of Snow Cap Paint Dabber. Then I lightly coated it with Vintage Photo Distress Stain.

I added some Distress Embossing Ink to the raised impression of the tree and sprinkled first Vintage Photo and then a little Walnut Stain Distress Embossing Powders on to the tree. I did this because I wanted a two tone embossed tree; using the darker browns. I like the variation in color that I got. And, Distress Embossing Powders have a great texture after they are heated; sort of a sandpaper feeling...like the bark of a tree.

I colored a manila tag with more of the distress ink colors and began punching leaves out of it.

These leaves were then distressed with Gathered Twig and either Rock Candy Crackle Paint or Rock Candy Stickles and glued in place on the tree with Glossy Accents.

Now all of my pieces were completed and ready to assemble. I slid the top embossed portion of the tag on top of the folded tag base, hiding the acetate mechanism. Then I used the Scor-Tape on the mechanism face to hold the tree in place. I attached a piece of black elastic cording at the top of the folded manila tag BEFORE I slid the embossed tag in place, using Tim Holtz' Tiny Attacher.

Finally, I wanted to finish the outside covers of my pop up tag. I sprayed the back with several different Glimmer Mist colors: Lemon Meringue, Dreamsicle, English Ivy, Jack O' Lantern and Sunflower. Then I distressed it with a little Gathered Twig. On to the front...
As I was working on this piece, I kept remembering a poem that I had learned in school "Trees" by Joyce Kilmer. It's such a lovely poem and so befitting this tag.

So, I picked a font, typed out the poem, sized it to fit a #8 Manila tag and printed it out. In this picture, you can see the before and after of the poem.

Once I sized it to the pop up tag, I distressed the poem, using the above mentioned Distress Ink colors.

I stamped the little vine print and then attached a few more of the little punched leaves I'd made. I also colored in the leaves on the vine using a Peeled Paint Distress Marker diluted with a Small Sakura Water Brush. I love how it turned out! Then I attached a copper finish Hitch Fastener, looped my elastic cord over the Hitch Fastener and my pop up tag was complete.
I hope that this piece has inspired you to create something beautiful using leaves...stamped, waxed, masked, whatever you choose. Then enter your piece into our weekly challenge at Simon Says Stamp and Show. You could be the lucky winner of our
$50.00 gift voucher. You could also be chosen as one of our TOP THREE entrees for the week and that is quite an accomplishment! Think leaves and let's see what you come up with!
Here are the Simon Says Products I used in this piece:
 |  | |  |
 |  |  | |
 | |  |  |
 | | |  |
 |  |  |  |
 |  |  |  |
 |  |  |  |
 |  |