Let me be one of the first to wish you and yours a very happy, safe and prosperous 2013! Can you believe that another year has come and gone so quickly?
Let's get this new year started off with a party! A Mad Hatter's Party! This week at Simon Says Stamp and Show, it's all about having fun creating your challenge piece!

I chose to take the theme literally and create this adorable little vintage suitcase. I'd originally seen this Sizzix Suitcase Bag on a fellow Design Team member, Anna Karin's blog and loved it. The basic suitcase measures approximately 4 1/2" x 3" and it about 1" deep.

It is very easy to put together. It's done with 8 little brads total (four on either side) and a couple of pieces of 1/4" Scor Tape to hold the handle and the cover to the rest of the suitcase. Here is a picture of my basic suitcase, all distressed and ready to go!

The handle is colored with Antique Bronze Distress Stain. I distressed the Core-Dinations Vintage Collection brown cardstock with Gathered Twigs Distress Ink followed by a black cats eye ink pad at the edges. I then randomly swiped the Antique Bronze Distress Stain over the suitcase.

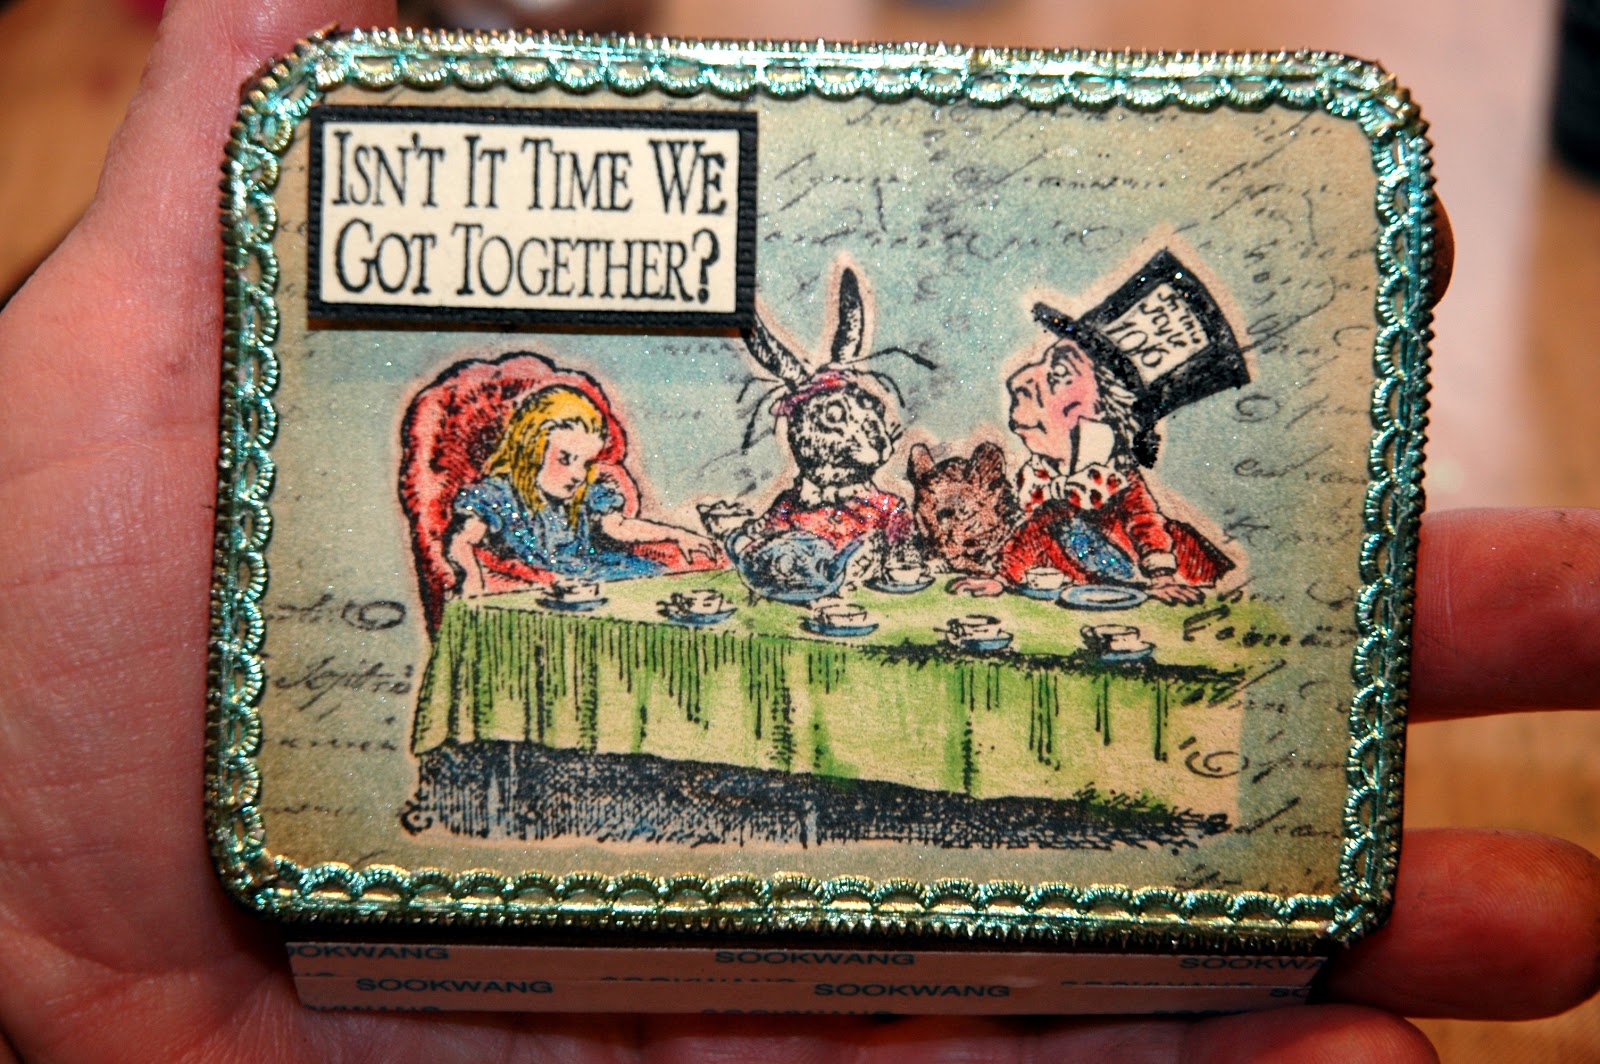
I began to design the cover, using some amazingly cool vintage images from my TJ's Design Mad Hatter Tea Party stamp set. This set is amazing! There were so many stamps that I wanted to use. I ended up making an extra interior flap so that I could do just that!

On the cover of my suitcase, I decided to create a scene using White Rabbit telling us to hurry up because we're late ... for a very important date with the Mad Hatter! The background is manila cardstock that has been colorized first with Essentials Water Color Pencils and gone over with a Sakura Water Brush. Then I added a bit of Tumbled Glass (sky) and Bundled Sage (grass) Distress Inks. After I created that background, I inked the rabbit stamp with Jet Black Archival just on the bunny and a combination of Peeled Paint and Pine Needles Distress Inks on the grass around him. I stamped that image once and cleaned off my stamp. I then reinked just sections of the grass images and randomly stamped them to create the field and path. I stamped another rabbit onto manila cardstock and colorized him using the water color pencils. I cut him out and popped him on top of the image already stamped onto the scene. Next, I added some metallic gold Dresden trim using 1/8" Scor Tape to hold it in place. After that was complete, I added some Glam Pink Stickles flowers to bring in some color.

The scene was coming together but it needed a dimensional "something". Then I decided to add this little "medallion"; made from manila cardstock and colorized with the colored pencils. I made another circle (a tad larger) to go underneath the colorized circle. I added Tim Holtz' Black Tinsel Twine using Glossy Accents to hold it in place. Then I added a pop dot and placed the colored medallion on top.

Add the sentiment and the front cover is complete. I glued this scene onto the cover of my suitcase and moved on to the interior ...

As you open the suitcase, I wanted it to feel like the playing cards that attacked Alice in the classic tale were jumping out of the suitcase. So, I used some adorable little playing cards from Kaisercraft that I recently purchased through Simon Says Stamp. THEY ARE SO CUTE!! If you follow my work, you know that I LOVE dimension and interactive parts.

So, in order for the cards to have some movement, I made little springs that I stuck on the backside of some of the cards so that they could move. I inked the edges of all of the cards with a Black Soot Distress Marker and glued the springs on with Scor Tape. Then on to the interior flap that I added ...
As I said, I loved all of these vintage style stamps so much, I wanted to use more than just what I used on the exterior of the suitcase. So, I added an extra interior flap.

It is actually the same die cut as the cover for the suitcase and then I just cut down the sides and top so that it would fit inside of the suitcase. I used manila cardstock and distressed the edges with Gathered Twigs and black cats eye ink pad. Then I stamped the tea party image onto the cardstock. I stamped out an additional image that I would later use as a mask when I added my background.

Let's get this new year started off with a party! A Mad Hatter's Party! This week at Simon Says Stamp and Show, it's all about having fun creating your challenge piece!

I chose to take the theme literally and create this adorable little vintage suitcase. I'd originally seen this Sizzix Suitcase Bag on a fellow Design Team member, Anna Karin's blog and loved it. The basic suitcase measures approximately 4 1/2" x 3" and it about 1" deep.

It is very easy to put together. It's done with 8 little brads total (four on either side) and a couple of pieces of 1/4" Scor Tape to hold the handle and the cover to the rest of the suitcase. Here is a picture of my basic suitcase, all distressed and ready to go!

The handle is colored with Antique Bronze Distress Stain. I distressed the Core-Dinations Vintage Collection brown cardstock with Gathered Twigs Distress Ink followed by a black cats eye ink pad at the edges. I then randomly swiped the Antique Bronze Distress Stain over the suitcase.


Cover in progress

The scene was coming together but it needed a dimensional "something". Then I decided to add this little "medallion"; made from manila cardstock and colorized with the colored pencils. I made another circle (a tad larger) to go underneath the colorized circle. I added Tim Holtz' Black Tinsel Twine using Glossy Accents to hold it in place. Then I added a pop dot and placed the colored medallion on top.

Add the sentiment and the front cover is complete. I glued this scene onto the cover of my suitcase and moved on to the interior ...

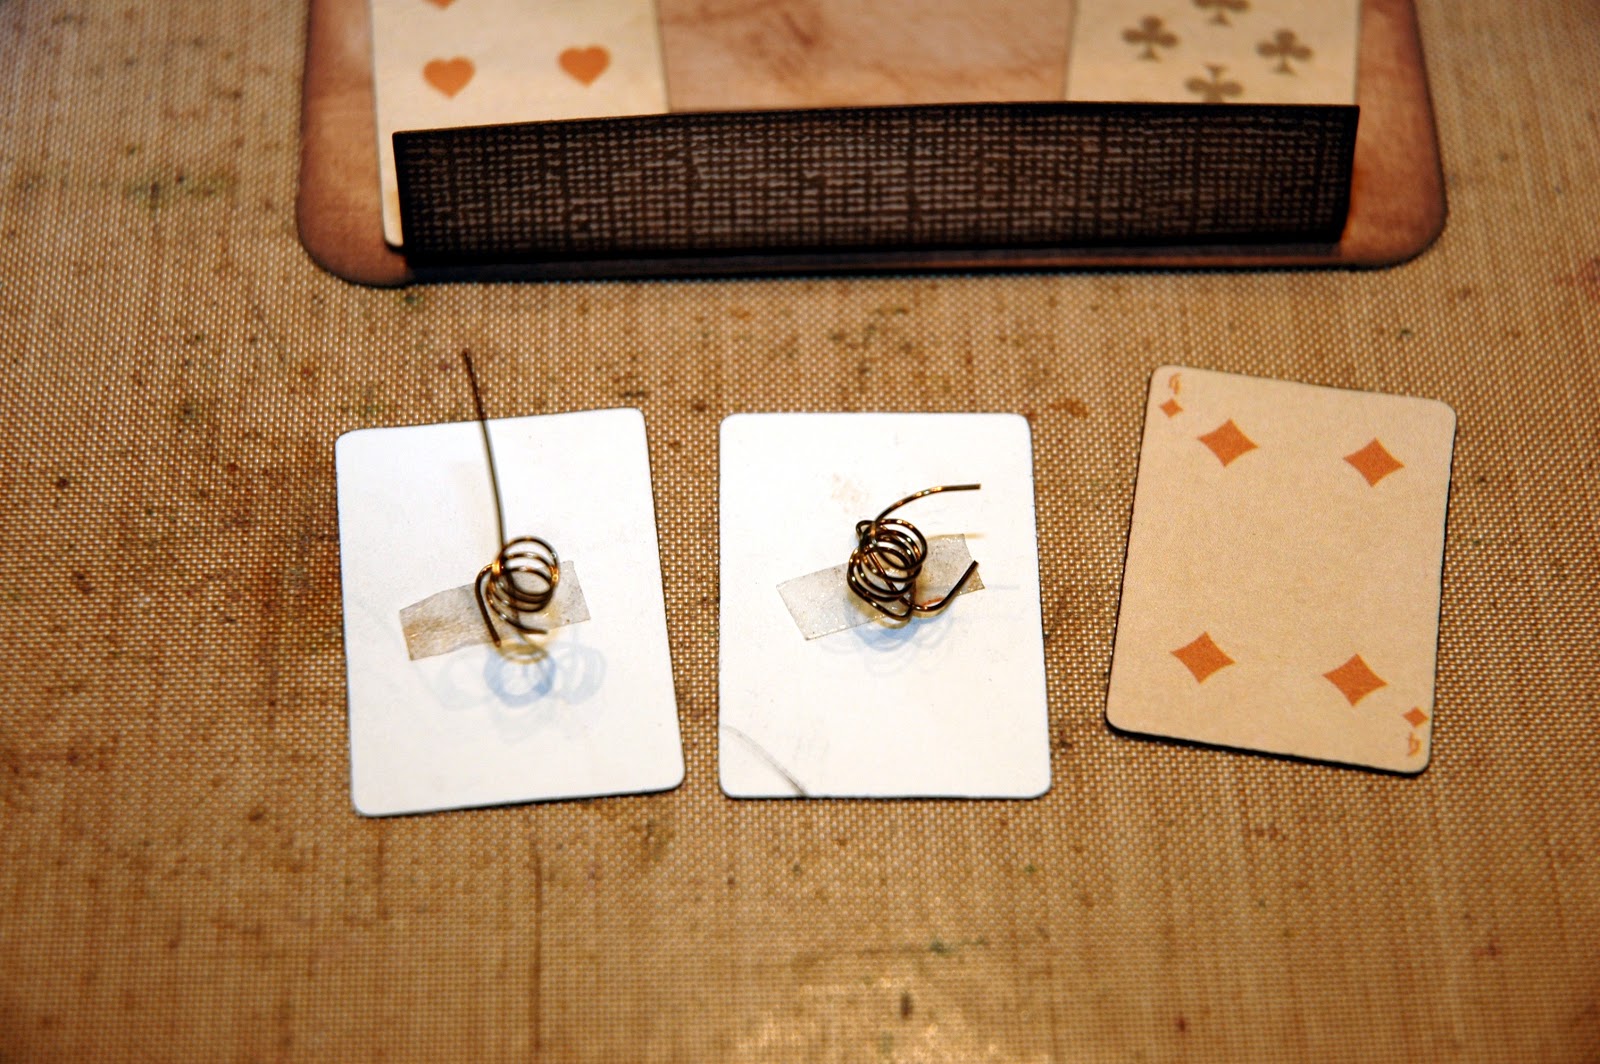
So, in order for the cards to have some movement, I made little springs that I stuck on the backside of some of the cards so that they could move. I inked the edges of all of the cards with a Black Soot Distress Marker and glued the springs on with Scor Tape. Then on to the interior flap that I added ...
As I said, I loved all of these vintage style stamps so much, I wanted to use more than just what I used on the exterior of the suitcase. So, I added an extra interior flap.

It is actually the same die cut as the cover for the suitcase and then I just cut down the sides and top so that it would fit inside of the suitcase. I used manila cardstock and distressed the edges with Gathered Twigs and black cats eye ink pad. Then I stamped the tea party image onto the cardstock. I stamped out an additional image that I would later use as a mask when I added my background.
For this flap, I wanted to create the illusion that the characters were actually coming to life; out of the pages of the classic tale. So, I laid the mask over the tea party scene and stamped a script stamp over it; reminiscent of a written manuscript. Then, leaving the mask in place, I inked around the scene first with Tumbled Glass and then with a little Broken China Distress Inks. Then I lightly spritzed the background with Biscotti Perfect Pearls Mist for a little sheen. I colored in the characters with various water color pencils and then highlighted some of the character's clothes with Waterfall, Glam Pink and Black Diamond Stickles. I added the teal metalic Dresdan foil trim using 1/8" Scor Tape and lightly wiped over it with a Chestnut Roan Cats Eye Ink Pad. Then I added the sentiment and that side of the interior flap was finished.

Here is the completed interior flap as it appears once I attached it to the suitcase. I also added the little clock that has a Glossy Accents "crystal" and the "FREE" space.

Here is how the suitcase appears when you open the cover. Now, onto the back side of the flap...

This is the backside of the flap pictured above before I attached it to the suitcase. I basically just used Tumbled Glass and a little Gathered Twigs on the manila cardstock to distress it. Then I used Tim Holtz' spritz and flick method to mottle the background. Finally, I added just a touch of Biscotti Perfect Pearls for that sheen. Next, I added a little piece of gold metallic Dresden trim around the edges with 1/8" Scor Tape and then proceeded to stamp and color in yet more of those gorgeous vintage images. I cut them out and added them onto the background. The black cardstock around "You're Invited" is edges with Platinum Stickles. I left just a bit of manila cardstock as an edge around all of the characters. I colored that area with an Antique Linen Distress Marker and then ran a Black Soot Distress Marker just along the edge.

Here is the additional flap that I've added once it is taped in place to the suitcase.

And here is how the little suitcase looks when it's opened to reveal the bags of tea that had been packed away for the party!

As a final touch, I can't believe I found a little white rabbit charm at a local craft store, so I added it with a Tim Holtz jump ring to the handle of my little suitcase.

All packed and ready to go to the Mad Hatter's Tea Party!!!
Now it's YOUR turn to put on your mad hat and create something fun to enter in our challenge. You could be the winner of Simon Says Stamp's

$50.00 credit voucher! You could also be chosen as one of our TOP THREE works of art for the week! Check out the amazing projects our Design Team has waiting for you at the Simon Says Stamp and Show blog!
Good luck and Happy New Year!!
Here are the products available through Simon Says Stamp that were used in creating this project:
 |  | |  |
 |  |  | |
 |  | ||
 | |  | |
 |  |  |  |
 |  |  |  |


