Monday, July 25, 2011

ANYTHING GOES!!

It's another Monday and you know what THAT means...it's time for another SIMON SAYS STAMP AND SHOW CHALLENGE!  This week....ANYTHING GOES!!

If you haven't already, you have just GOT to head over to SIMON SAYS STAMP AND SHOW'S BLOG and see all of the incredibly creative and wonderful creations that the Design Team has made for you.  Eye candy for sure!

Since "anything goes" is the theme, I wanted to do something really different!!  So, I made a necklace!
I created this pendant using Clear UTEE mixed with a little light pink embossing powder.

Did you know that you can color your clear UTEE with embossing powder?  Yep...you can!  It's all plastic....just different grinds.  So, it's compatible and works perfectly together!  

After I got my UTEE to a flesh color, I laid an Ornate Plate on top of a little face mold that I have and poured the UTEE into the mold, high enough to cover the inside rim of the Ornate Plate.  That joined the face and the Ornate Plate together into one piece.  Once it cooled, I removed the face from the mold.  I used some Perfect Pearls to colorize the face: Perfect Pearl and Rust mixed together.  Then to add some "blush" color to the face, I used more of the Rust.  When I was happy with the face, I gave it a little dusting with just Perfect Pearl to give it a little more subtle shimmer. 

I then painted the details on the face using different combinations of Espresso, Shell Pink, Butterscotch, and Cranberry Paint Dabbers that I mixed together or watered down and applied them with a small Sakura Water Brush.
 After I finished detailing the face, I added Glossy Accents around the edge of the face and on the upper portion of the head.  I combined some different glitters and miniature glass balls to create a unique "bling ring" to encircle the face.  I really like how it turned out...and the textures and colors work really well together.  It sort of reminds me of a Las Vegas showgirl's headdress.  I may try this again around Halloween...make the face out of green UTEE and make the bling around the face out of combinations of black glitters, etc.  I think it could make a cool witch pendant...reminiscent of the witch on Disney's Snow White. 

Next I used some paint from a Juniper Paint Dabber and smeared it on my finger tip.  Then I lightly brushed my finger tip across the Ornate Plate to give it a patina look.  I also used this technique on the Regal Adornment Wing and the two Foliage triple leaves attached at the top of the pendant.  I attached one pearl from Tim Holtz' Ideaology Baubles in front of the Regal Wing with a Jump Ring at the bottom of the Ornate Plate.  I also attached the distressed chain (that I found at Michaels to make this pendant into a necklace) with Jump Rings to the Ornate Plate.  There is also a small Lace Chain that is attached with Jump Rings and spanning from one side to the other of the Ornate Plate Pendant.  I wanted the face to be the focal point of this piece, so I decided not to add a lot of other stuff to the Ornate Plate pendant.

Now it's your turn to create ANYTHING!!  Then link it to our blog and maybe you will be the lucky winner of our sponsor ~ SIMON SAYS STAMP's ~

How cool is that?!  And...if you are chosen by our design team to have one of the TOP 3 projects submitted this week, YOU will receive our coveted TOP 3 BLINKIE to be proudly displayed on your blog!
I can't wait to see what you come up with for this week's challenge.  Remember...ANYTHING GOES!

Monday, July 18, 2011

A SAD FAREWELL TO SOME OF MY TEAMMIES

This is a short post to say a fond farewell to three of my wonderfully talented Simon Says Stamp and Show Design Teammates.  I have only been on the team for the past 6 months but I have come to admire each of these ladies and their work so much.  I hate to see them leave because we are such a cohesive and fun group.  They will be missed.  But, I know whatever the future holds for them...they will be amazing!

So, this leaves some spots open for our Design Team.  Let me say, this is one of THE MOST fun experiences I've had!!!  The team members are so creative and challenge me every week to try to come up with different and challenging pieces for you.  The themes are broad and you're not limited to just a few products to work with.  That is just one of the things I love about this Design Team.  I also love this style...Tim Holtz, Wendy Vecchi, Vintage style.  The mixed media arts are my passion and this challenge lets you explore all sorts of mediums, styles...whatever your creative urges are telling you to do!   

If you love this style and you are so inclined, you need to apply for a position on this team.  It is an amazing opportunity and a wonderful experience!  Check out Simon Says Stamp and Show's Blogspot  for more details.

CRISS CROSS APPLESAUCE...HOW ABOUT LET'S EMBOSS?!

Happy Monday everybody!  Time for another Simon Says Stamp and Show Challenge!  This week, Simon Says .... "Show Some Embossing!"  Click on the link above to visit the challenge blog and see what wonderful creations the Design Team has for you this week.  Inspired as always!

This week, I decided to make something I've never made before.  I made a chunky ATC card.  There is some sort of embossing on each side; be it dry embossing or heat embossing.  Sometimes BOTH!
The ATC cards were cut from Tim Holtz' new ATC & Corners Die Cut.  The sides and top, I created on my own out of chipboard.  The sides are approximately 2 1/4" wide and the top and bottom measure 2 1/4" x 2 1/2".  I covered the top and bottom with a scrap of paper I had left from Graphic 45's Steampunk Debutante paper.  
The front of my chunky ATC card features a background I dry embossed using Tim Holtz' Pocket Watch and Steampunk Texture Fade on cream cardstock colored with Tumbled Glass Distress Ink.  Then I lightly swiped a Distress Embossing Ink pad over the raised part of the embossed design and sprinkled Gold and Copper Embossing Powders on it.  I heat embossed the powders. Next, using Tim Holtz' Steampunk stamp set, I added the two gentlemen and the "Admit One" images to my embossed background.  I love metal and what is a steampunk piece without metal?  So, I added gears from 7 Gypsies Industrial Gears.  The two watch parts have images stamped and embedded with Glossy Accents to give them a protected "glass like" surface.  Then I wired them together and hung a piece of gold chain to finish off that side.
SPEAKING OF GLOSSY ACCENTS...TIM TOLD US A LITTLE TRICK AT RANGER U REGARDING HOW TO KEEP YOUR GLOSSY ACCENTS FROM CLOGGING UP AND IT REALLY WORKS!!!  AFTER YOU HAVE USED YOUR GLOSSY ACCENTS, GIVE THE BOTTLE A GOOD TAP ON YOUR WORK SURFACE AND THEN PUT THE CAP BACK ON IT.  JUST ONE GOOD TAP.  I HAVE DONE THAT EVER SINCE RANGER U AND RARELY HAVE A CLOG NOW!!!  
Moving to the side, I distressed a piece of cream cardstock with Dried Marigold Distress Ink.  I stamped a portion of text from Tim Holtz' Papillon stamp set.  I also double stamped and heat embossed two different butterflies using the Papillon set.  They are heat embossed using Distress Embossing Ink on black cardstock.  I then sprinkled several different colors from the wonderfully vivid Adirondak Embossing Powder family:  Stream, Butterscotch, Lettuce, Wild Plum and Red Pepper.  I stacked the butterflies and glued them at the bodies only so that the wings would appear to be fluttering.
The back side of the chunky ATC card features the dress form from Tim Holtz' Haberdashery stamp set.  It is stamped onto a piece of Sticky Back Canvas that has been colored using Tumbled Glass Distress Ink.  The ruler, from Tim Holtz' Curiosities stamp set, has been heat embossed using Black Embossing Powder.  The bottom of the dress form sports three little organza roses from Tim Holtz' Trimmings.  They are colored with Wild Honey Distress Stain.  There is also a stylish little flower "corsage" on the dress form's shoulder.  This was made using another of the organza roses combined with a metal flower and fastener from Tim Holtz' Foliage.  A copper Chain Tassel also hangs from the flower.  I added a little stitching using black wax thread and hung a metal Hanger Clip from Tim Holtz' Ideaology line on it.  Finally, I added a button with more black waxed thread and a tag with a heat embossed sentiment "BELIEVE IN YOURSELF" from Wendy Vecchi's Art Inspiration stamp set
The final side of the ATC card is dry embossed using Grungeboard and a portion of Tim Holtz' Patchwork Texture Fade.  I painted it using a Silver Paint Dabber.  That seals the Grungeboard and creates a perfect surface to add Alcohol Inks.  I combined Stream, Butterscotch and a bit of Ginger.  Then I highlighted the entire section by lightly rubbing Perfect Gold Perfect Pearls over the raised areas with my finger.  To embellish, I created my own "BEE CREATIVE" design on the computer and sized it to fit into a 7 Gypsies Antique Brass Optical Lens.  I put the design in place using Glossy Accents because it dries clear.  Then I added a piece of gold chain and a Tim Holtz Word Key.  
The top of my chunky ATC card is embellished with a copper clock face from Tim Holtz Timepieces.  I lightly smeared some Juniper paint from a Paint Dabber onto the clock face to give it a patina look.  Then I added a crystal knob to the top from Tim Holtz' Curio Knobs.  The piece stands on two wooden blocks that have been painted with black paint and smeared with Juniper paint for a shabby chic look.  Then I wrapped all of the edges with Sketchbook Tissue Tape that has been colored with Frayed Burlap Distress Ink.

Dry embossed, heat embossed....this little piece has both!  Now it's YOUR turn to SHOW SOME EMBOSSING!  Enter your piece in our challenge at Simon Says Stamp and Show.  We have a randomly drawing each week for a lucky someone to win a
    
$50.00 credit voucher at Simon Says Stamp!  Great prize!!  But, that's not all!! If you are chosen by the Design Team to have one of the top three entries, you will be awarded our coveted TOP 3 BLINKIE to proudly display on your blog!

So, enter today and YOU could be our next winner!  Thanks for taking the time to stop by my blog.  I hope you liked my chunky ATC card and may even be inspired to try one for yourself!  This was my first...but I'm sure it won't be my last!  They are way fun to make!

Have a wonderful week and remember...take time to PLAY!!  It's SOUL FOOD!!!

Thursday, July 14, 2011

MODIFIED PATCHWORK PANDEMONIUM IS COMING TO SCRAPBOOK GENERATION!!!

Hey everybody!  I'm excited to announce my next class that will be at Scrapbook Generation here in Springfield, Missouri on Monday, August 22nd from 12 to 5 pm.  I'm calling it "Modified Patchwork Pandemonium!"
Here is what we will be making.  

This class is a Tim Holtz technique rich class.  You will be working with Distress Inks, Distress Stains, Perfect Pearls Mists, Crackle Paints, Distress Stickles, Paint Dabbers, Alcohol Inks Grungebaord, Tissue Tape and of course, Ideaology.  You will learn several distress techniques that you will incorporate into this piece...but the techniques can be used on so many things...not just this wall hanging!  My collection of Tim Holtz and Wendy Vecchi stamps will be available to the class so that if you don't like the stamps I've used in this design, you can create your own, uniquely YOU piece!

This wall hanging is set in a 7 Gypsies 12x12 black frame with six 4x6 compartments.  It will be a beautiful addition to your home or craft room! 

There is limited space for this class so call Scrapbook Generation now at (417) 886-0440 to reserve your spot.  This class is only $45.00.  

Wednesday, July 13, 2011

SIMPLY CHARMING...

A couple of weeks ago, I made a post about an upcoming charm swap hosted by Roni over at Ink Stains.  There's still be time to get involved...click on the "charm swap" link to check it out.  Charms are due in Roni's hands by 8-6-11.  

I made 5 charms for the swap and I need to get them in the mail.  But, before I do, I wanted to share them with you.  This is my first attempt at something like this...and it was FUN!!
We were to make different charms in groups of 5 to be swapped.  I only made one group of 5, but I'll get 5 charms back!!  And my charms will go to 5 different people!  I'm really excited to see other people's creations!!

I made the bird and nest charm using Tim Holtz' Ideaology Adornments bird and then used the technique I learned from Tim at a class to make the wrapped wire nest attached to the bird.  The other four charms are in metal pendant frames I found at Michaels.  I loved those frames!  I turned them upside down and attached a bale to the top so that I could dangle charms from the bottom of the pendant.
I fooled around on the computer and created the artwork to put in the little metal frames.  I found the images and added my own words to them then sized them to fit into the frames and printed them out.  The BEE CREATIVE background is colorized using Scattered Straw Distress Ink. I secured my images in the metal frames with Glossy Accents and then placed the cabochons on top.  (They came with the frames).  
 I made my own artwork for these two charms on the computer as well.  The "LET YOURSELF FLY" charm was covered with Glossy Accents to seal it as it did not come with a cabochon.  Then I went digging through all my beads and little charms and my findings to create little dangles to wire onto the pendants I'd made.  Such fun!!! 

Now to get them securely wrapped and off to Roni's house!!  I'll share the charms I receive on my blog after I get them.  I sure hope the people who receive my charms like them!
 

GREAT LITTLE METAL FINDS

Hi everybody!  I'm quite "chatty" this week, huh?  Here is something I just HAVE to share with you.
For those of you who are Tim Holtz fans and love his Configuration Boxes, I found some cool little metal things at a flea market and just HAD TO HAVE THEM!
Just LOOK at these little beauties!  Now, many of you may already have seen them, have some...whatever!  I had not and now I'm infatuated with them!  They are metal PENCIL SHARPENERS!!!  And....even better...some of the parts actually MOVE!  For example...
This old time piano...the top lifts up to expose the piano keys!
This fan...the blades turn and the head actually moves up and down a little.
The cash register...the drawer pulls out and the handle cranks!
And my favorite...the vintage typewriter!  The paper feeder actually rolls!

Are these not just the coolest little things?  And imagine how awesome they would look in a Configurations Box!
My oldest grandson is a train nut!  So, I have a caboose (in the picture above).  The back door opens, exposing the pencil sharpener.  I just bought an old engine and a mid car on Ebay.  Yes, Ebay!  I was doing some Googling and found them on Ebay.  So, now I don't have to just "happen" on them at a flea market!  Hmmm....maybe that is not a good thing, come to think of it!  Just what I need...another way to spend money! haha  

I paid $3.00 each for the trains I just bought.  The prices vary and so does the shipping...so check that out before you purchase.  Some people must think their little metal pencil sharpeners are made out of gold! (haha)  But, you can pick up a lot of these for around $3.00 each. They are way cool and I can't wait to use them in a box.

Have a great day...whatever it is you are doing!

Tuesday, July 12, 2011

Grungy Monday 15

It may be Tuesday but for me, it's GRUNGY MONDAY!  I love this challenge because it's all about THE TIM and his amazing techniques!  Yes, I freely admit it...I'm a HUGE t!m fan!  It you've not checked out his Summer CHA previews yet, better hop on over to his BLOG and have a gander.  Really cool stuff!

The technique for this week is from Tim's very first 12 TAGS OF CHRISTMAS ~ DAY 7 ~ 2007.
I won't give away the technique but you can click on the link above and be transported to Tim's blog to check that out for yourself.  This is one of my favorite techniques.  The results are AMAZING!  I love to call it Rusted Enamel.
This tag started out as a manila tag.  I die cut "IMAGINE" using Tim's Movers and Shapes "IMAGINE" die cut.  Then I put black cardstock behind it.  The background colors for this tag were Tumbled Glass and Wild Honey Distress Inks.  I blended them together and then did the technique for this week.  The "pitting" was colorized with Frayed Burlap Distress Ink.  I wiped away the excess Frayed Burlap and then using Jet Black Archival Ink, I stamped a design from Tim's Bitty Grunge stamp set.  Most of it is covered up with the quote...but you can still see some of the black design from underneath.  
The quote was something I found on the internet and thought was perfect for an "IMAGINE" tag. "TRUST THAT LITTLE VOICE IN YOUR HEAD THAT SAYS, 'WOULDN'T THAT BE INTERESTING IF...' AND THEN DO IT."  Totally true and perfect example of using your imagination!
I colorized the saying using primarily Tumbled Glass Distress Ink and then spritzed it with Sunflower Sparkle Perfect Pearls Mist.  Then I mounted it on a piece of black cardstock and pop dotted it in place.
  The black flower is four layers of one of Tim's Tattered Florals die cuts on black cardstock.  I then sprayed the black cardstock with Ink Refresher and worked it into the cardstock.  If you have not tried this....you really need to!!!  The ink refresher actually changed the texture of the cardstock to make it feel like suede or leather within seconds.  It's AMAZING stuff!
Then I crumpled up the flower and semi smoothed it out again so it would take on even more of an appearance of faux leather.  I then brushed on some Perfect Pearls powders:  Sunflower Sparkle, Berry Twist and Turquoise.  They give a great iridescent glow to the faux leather flower.  Then I put the flowers together, joined them with some black wax thread and a gold-ish button and put them in place on the tag.  There is also a little flower petal peeking out from under the bottom of the saying.  
The ribbon is Hug Snug seam tape.  One piece is black and the other I colorized using Wild Honey Distress Stain and my own concoction of Broken China and Blue Patina Perfect Pearls and water mixed together in a Mini Mister.
Enjoy your day and remember to take time to Play ... It's SOUL FOOD!!!

Monday, July 11, 2011

KEEPING YOU IN STITCHES

Simon Says "SHOW SOME STITCHING" ... faux or otherwise.  
I have to admit, I love stitching on pieces but rarely do it.  I guess I just don't think of it.  But, it really does add so much; whether you hand stitch, machine stitch or just make some faux stitching marks.

Just wait until you see what my design teammates at SIMON SAYS STAMP AND SHOW CHALLENGE have for you this week.  SO AMAZING!!  You just have to see their designs for yourself!  What a talented, creative group! 

I finally finished my "Patchwork Pandemonium" piece from my weekend of classes with Tim Holtz a few weekends ago.  I added some stitching to it and decided to share it as my Simon Says Challenge piece for this week.
I was fascinated with this creation from Tim the first time I saw it several years ago.  Then he quit teaching it.  But, he decided to "revive" it again.  I am so glad and happy that I had the opportunity to go to Stampers Ink in Shawnee, KS and take this class from "THE MASTER HIMSELF".

Patchwork Pandemonium is a technique rich piece.  It is a conglomeration of Grungeboard.  Some is embossed with a variety of Tim's wonderful Texture Fades.  Some is left plain to either colorize with Crackle Paints, Distress Stains, Paint Dabbers, Alcohol Inks, Perfect Pearls Mists, Distress Stickles or cover with Tissue Tape.  

Techniques incorporated into this piece include Shabby Chic/Industrial Grunge, Distress Crackle Grunge, Distress Stain and Stamped Grunge and Double Distressed Grunge.  

The pandemonium part is that you literally just have a bunch of rectangles and squares of Grungeboard in front of you.  You just start using the different techniques to finish off the Grungeboard shapes, not having any idea how they will lay out on your finished design.  But, that is also the FUN of it!!!  It's AMAZING how it all works out!  Once you've finished all your pieces, there is a pattern that you need to follow to lay them all out and be sure that they end up in a 12 x 12 square.  Then you attach them to a 12x12 piece of Grungepaper as the backing by using Wonder Double Sided Tape.

After you have everything in place, you can begin embellishing it, leaving a slight space around the perimeter so that it will fit in a frame.  We embellished using Tim's wonderful stamps, pieces from his Ideaology line, Grungeblocks and whatever else we wanted to add.
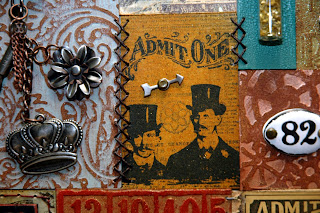
We were also given some wax thread and a needle to stitch our piece if we wanted to.  I think the stitching adds so much!  

If you want uniform stitching, it is so much easier if you use Tim's Design Ruler to punch the holes.  His ruler is designed with small holes that run the entire length of the ruler on one side.  Just lay the project on top of cork or a surface you can pierce.  I used my Tonic Craft Pick to punch the holes evenly where I wanted them.  Then I began on the backside and made my stitches.

 In this area, I used dark brown waxed thread to make a cross stitch pattern.
Here I chose a blue wax thread to make a few box stitches on one side and then a random weave stitch across the top of the dress form rectangle.
I chose to go with an eggshell colored wax thread in the center of my piece to add a bit of interest around the Admit One ticket.
Still more stitching.  This time I used some brick red wax thread to make a few straight stitches above my Grungeblock.
You can add as little or as much stitching as you choose.  Here, I elected to just make three little cross stitches with the dark brown wax thread.  And...if you'll notice over to the far left, "THE DUKE OF DISTRESS" autographed my piece....making it even MORE special to me!  Gee...I wonder if I should have asked him to STITCH it?!  (haha)

My "Patchwork Pandemonium" will have a permanent place on the wall of my studio.  I totally LOVE this piece and will treasure it always.
Now it's YOUR turn to stitch something!!  Then post it to our SIMON SAYS STAMP AND SHOW CHALLENGE.  If you're out lucky random drawing winner, you will win our sponsor's most generous prize of .... (drum roll) ....


If you are chosen by our design team to be one of the TOP 3 projects entered for the week, you will receive special recognition for your amazing work by receiving our TOP 3 Blinkie Award to proudly be displayed on your blog.

So, whip out your needle and thread and add some stitching to your project!  I can't wait to see what you come up with!!!

Monday, July 4, 2011

FLOURISHES

Happy FOURTH OF JULY everybody!  Thanks to all of the wonderful men and women in our Armed Forces who give so much of themselves to protect our freedoms.  My son in law has done 2 tours of duty in Iraq.  Having him in our family has made me even more keenly aware of the sacrifices our veterans and their families make to defend this country.

I hope everyone has been enjoying this holiday weekend!  But, here's another reason to celebrate...it's MONDAY and time for another Simon Says Stamp and Show Challenge!  This week's theme....A FLOURISH!

Let's see....there's the obvious way to use a flourish and then there's....hmmm....arms!!!  How about using flourishes to make arms?!?

 This sassy Steampunk Diva has a lot of Tim Holtz' elements in her construction.  Her body is stamped and cut from Tim's Haberdashery Stamp Set on to a piece of kraft paper.  Her arms are Tim Holtz' Mini Flourishes cut from Grungeboard.  But, I'm getting ahead of myself.  I better tell you about the background for this wall hanging and the more conventional use of flourishes first!

The background for this piece is a sheet of that lovely Graphic 45 Steampunk Debutante paper adhered onto a chipboard cut out.  I distressed the G45 paper with Tumbled Glass and edged it with Frayed Burlap Distress Inks.  I then stamped some really delicate flourishes from Tim Holtz' Fancy Flourish Stamp Set randomly around the edges of the the wall hanging.  These were embossed with Gold Embossing Powder.  I love how they turned out.  They are there, but they are wispy; not overpowering ...just blend in perfectly to the background.  Finally, I attached a piece of copper chain to the top using Long Fasteners and I added two copper gears from Tim Holtz' Sprockets and Gears as the finishing touch.
This Diva's tiara is a Weathered Clock Die cut from Shrink Plastic (oh my gosh...I love that stuff!  I was playing with it this past weekend and had a blast!  Warning!!!  It's addicting!)  After I shrunk it using a heat gun, I painted it with a Gold Paint Dabber.  I also added little watch parts to her hair to compliment the gadgets and gear that make up her hair on the stamp itself.  Other than the lady's face, all of the stamping I did on her was done with Gold and Copper Embossing Powders that I simply sprinkled onto the stamped image then heat embossed it.  That way, you get a more random effect for a metallic look...which I like.
Her flourish "arms" are displaying a conglomeration of little charms I made.  I'm sure you'll recognize the little birdcage and bird.  It's Tim's Caged Bird Die cut out of Shrink Plastic.  After I made it shrink, I colored it using Paint Dabbers.  The little holes remained in tact so I added little shell pink pearl charms to the bottom of the cage.  The little wire nest (on the opposite side) is a technique I learned from Tim during our "Ideaology Intrique" class at Stampers Ink a couple of weekends ago.  I love it!  I'm also sort of on a charms kick right now...thanks to one of my crafting buddies, Shirley of Shirley Hall Designs(She's a bad influence on me because I see her beautiful work and it gets me wanting to crank out my jewelry stuff again...and of course, I have to buy yet MORE supplies.  Isn't that how that goes? haha)  

So anyway, I wanted to somehow incorporate some charms onto this week's piece....perfect solution...flourishes for arms!  I finished off this piece with that wonderful saying from Wendy Vecchi's A Form Of Art Stamp Set... "Her style was SASSY with just a bit of ATTITUDE."  I thought that sentiment fit this steampunk Diva to a tee!

So there you have it, my take on "FLOURISHES".  Now it's YOUR turn to show some flourishes!  Check out the wonderful creations that the Design Team has waiting for you at  Simon Says Stamp and Show.  My Design Teammates "bring it" for you every week!  Their creativity never ceases to amaze me!!!  All of the wonderful ideas and products they use....WOW!  So, get your ink on and create something fabulous!  Link your design to our wonderful sponsor's blog and you could be the winner of Simon Says Stamp and Show's every generous prize of .... 

That's right!!!  A $50.00 credit voucher!!  And...if your creation is chosen as one of the best three submitted for the week, you will be awarded our TOP 3 Blinkie to proudly be displayed on your blog.  So what are you waiting for...show us your FLOURISH!